Thursday, September 24, 2009

- Turn Monitor off using keyboard

If you are using a Desktop computer then it’s easy to turn On or Off your monitor screen.  But still if you are lazy enough to stretch your hand to the monitor screen we have one cool small app to make your life easier.
PushMoitorOff is a tiny app which allows you to control your monitor screen from your keyboard. This tool comes handy for laptop users too. As most of the laptops don’t have the different On/Off button for the screen. So those who believe in saving energy can use this tool when needed.
The app is very easy to use. Whenever you feel like turning on/off your monitor you just have to press Shift+f1. You can change this shortcut key also using the options provided in the software.
PushMonitorOff

Download PushMonitorOff (211 KB)


- Yahoo messenger 10 beta offline/standalone Installer

We previously discussed about the Yahoo Messenger 9 offline installer here.
Yahoo messenger 10 beta is out now and is available for download. The most noticeable feature of it is the new High Definition Video Chat. Till now we had only standard definition video chat in Yahoo Messenger.One more new feature is we can now keep the video callers on hold too which was not possible in previous versions of it. The video can be maximized to full screen also.
Yahoo Messenger 10 Beta
Yahoo messenger has added one more feature which is common in almost all social networking sites like facebook,  orkut, twitter etc. That is Status update notification. Now whenever your friends change their status you will get an update inside your yahoo messenger under the Y!Update tab. So checkout the new Yahoo Messenger 10 beta version now. Here is the download link.

Download Yahoo Messenger 10 Beta Offline Installer

OR

Download Yahoo Messenger 10 Beta web installer

- Create your own themes for Mobile

I always wanted to make unique themes for my phone. But don’t have that much knowledge of Mobile Programming and stuff. But now I can do this with ease using this online service named OwnSkin.You can get thousands of themes from other websites for free but it  makes you fill special if you can have something unique for your Mobile.
OwnSkin
Go to OwnSkin.com and register there. Registration is completely free. Login to your account and start creating your themes.
The procedure is very simple. After logging in to your account click on “create new” button. Then select “Make a Theme”. Then use your imagination to create your unique themes and show it to the World.


- Best Computer Tricks – August 09

Here is the list of Top 5 most popular articles published in last month. These articles grabbed the highest attention of our readers in the month of Aug-09.
  1. 10 Must-Have apps for your USB PenDrive

  2. How to Transform your Photos to Pencil Sketch

  3. How to turn monitor off using Keyboard

  4. Some funny pranks to play on your friends PC #2

  5. [HOW TO]Password protect files & folders for free

Here are some more which are actually good but somehow didn’t manage to get the attention of our readers.

- Free Kaspersky 2010 license Keys

Kaspersky is one of the best antivirus product available right now. MSN china is giving out 6 months license key for Kaspersky 2010. But even people from other countries can  get benefit of this offer. All you need is one MSN account. Follow the procedure given below to get the free Kaspersky license key for 6 months.
  • Go to MSN China page.
  • Click on the Big Orange button.
    Free kaspersky Keys
  • Now enter your Windows live login details at the next page.
    Free kaspersky license Keys
  • Once you login using your live id you will be redirected to the page where you can see kaspersky 2010 license keys for your account.
But the problem is this key will work with Kaspersky Chinese verions only. If you want to use this keys with your Kaspersky 2009 checkout this article at MyDigitalLife.

Workaround to Activate Kaspersky Anti Virus 2009 English Version with Chinese Activation Code


- Recover data from damaged CD

Recently when I was going through my collection of old cds, I saw that almost all of them have some scratches all over it and they have become mostly unreadable. I wanted to copy some data out of it but my pc was unable to read from the CD.
I tried several softwares to recover the data from my CD and finally I came across this life saving free tool.CD Recovery Toolbox supports almost all kind of disks like CD, DVD, HD-DVD, Blu-ray disks etc. This tool actually works when it comes to recovering data from physically damaged CDs. So if you have any damaged CD or DVD and want to recover some data from it give this a try and I am sure you won’t regret.
Recover data from scratched/damaged CD
It’s a freeware and small in size. This tool allows you to copy the part which is not damaged. So if you are copying some song which is not readable this software can copy the song but the unreadable part will be missing. This can be useful because in Windows even if some small part is unreadable it will not allow you to copy the whole file.

Download CD Recovery Toolbox(656 KB)

- make free international calls

Yupp, it is possible and it’s 100% working. You can call on any number from your number that too for free. If you want to make free calls to anywhere in the world just follow the steps given below.
  1. Go to mobivox.com and register for free account.
  2. You will receive a email for verification. Verify  your account by clicking on the link you received in your mail.
  3. Now login to your account at mobivox using your email id and pin number.
  4. After logging in click on direct webcall.
  5. There select the country in which you want to make the free call. Enter the number you want to connect to.
  6. After that you will receive a call on your phone and then you will be connected to the number you entered earlier.
  7. Now you can talk with that person for five minutes only. If you want to talk more then add some money to your account.

- Light weight linux for your PC – Just 11 MB in size

Looking for some light weight OS for your 10 year old PC?? Now you can put life in your old PC with this light weight OS. Linux Tiny Core can run with your P1 – 128 MB RAM PC and ya it has GUI too.
The size of this tiny OS is nearly 11 MB and the whole OS can reside in you RAM when running. It takes only 11 MB of RAM to  run this OS. As it sits in your RAM it works pretty fast then any other OS.
Tiny Core Linux
Tiny Core Linux
To use this OS download the iso file from the link given at the end of this article. Burn this image file to any CD or mini CD and install it on your system.To read more about Tiny Core Linux go here.

Download Tiny Core Linux(11 MB)

- Use flashget for accelerated downloads

Flashget is a free open-source download manager. It increases your download speed by splitting your download in multiple parts. It supports various protocols such as FTP, BT, MMS, RTSP and ed2k. It also allows the user to download torrent files.
Flashget
FlashGetuses Multi-server Hyper-threading Transportation technique to increase the download speed. It divides the file in multiple parts and then sends multiple request to the server for downloading. Thus it utilizes the maximum speed of your internet connection.
It will work on almost all Windows Operating Systems. This tool can automatically shut down your computer when your downloads are over.Just 5 MB in size , easy to use, clean and simple design.Overall I’ll give it 8.5/10. It’s worth a try. You can download it from the link given below.

Download FlashGet(4.44 MB)

- How to remove new folder.exe virus from pendrive

If you are using pendrive for data transfer at school, college or at your office you must have come across this virus. This virus creates an exe file in your usb drive with the name New Folder.exe. Here are some symptoms of this virus.
  • Task manager is disabled.
  • Registry Editor is disabled.
  • Folder options not working.
  • Taking too much time for accessing pendrive.
  • Uses half of your computers processing power.
You can easily remove this virus from your computer by using Smart Virus Remover tool. It is a small 550 Kb file. Just download the file from the link given at the end of this article. Run this downloaded exe by double clicking on it.Then click on “Delete Autorun.inf file”. After that click on ” Remove virus from USB”. The virus will be removed from your pendrive. To restore your task manager, registry editor and other things which were disabled by virus – click on “Restore Default Windows Settings”.
remove new folder.exe virus

Download Smart Virus Remover

- Opera 10 portable for your PenDrive

Recently Opera 10 browser was released and according to users it is more stable and faster than Mozilla Firefox. Most loved feature of opera 10 is it’s Turbo mode which is known as Opera Turbo. It enables fast browsing by compressing the pages.
Opera Turbo uses compression technology that provides significant improvements in browsing speeds over limited-bandwidth connections, for example, when using a crowded Wi-Fi in a cafe or browsing through your mobile phone while commuting.

Features of portable Opera 10:

  • Opera turbo mode for fast browsing.
  • Browse privately from any PC.
  • No traces left behind.
  • Does not modify your current browser data by any means.
  • No registry entries.
  • Easy to share with friends and family.

How to enable Opera Turbo mode??

To enable Opera Turbo mode go to Tools->Quick Preferences and then select Enable Opera Turbo

opera 10 - enable turbo mode
opera 10 - how to enable turbo mode

Download the zip file from the link given at the end of this article and extract it inside your USB drive. Now you can take the new and fast Opera 10 with you anywhere you go.

Download Opera 10 portable(10 MB)

- Host a counter strike game on your own PC

Procedure to create your own counter strike dedicated server
Ever wanted to host a CS game on your PC?? Here is the procedure to start your own dedicated server for CS. Just follow the steps given below.
  1. Download and install HLDS Update tool from here.
  2. Open cmd and navigate to C:\Program Files\Valve\HLServer. To do this type cd C:\Program Files\Valve\HLServer.
  3. Now type HldsUpdateTool.exe -command update -game “cstrike” -dir and hit enter. This will install the server files on your computer.
  4. In this process it downloads the required files from the server(~ 300 mb)  so it may take some time depending on your internet connection.
  5. After the files are downloaded you will see a “HLDS installation up to date” message.
  6. Now your server is ready all you have to do is start your server and set the options according to your needs.
  7. To start the server go to C:\Program Files\Valve\HLServer and double click the hlds.exe file.
  8. If you are behind the router you may have to do port forwarding. To know if you are behind the router or not go to cmd and type  ipconfig. Now see what is showing in opposite the IP ADDRESS. If it is something like 192.168.1.xxx then it means you are behind the router and you will have to do port forwarding. For more info on port forwarding go to portforward.com.

- Speed up firefox by SpeedyFox

Mozilla is one of the most popular browser used to surf the internet and my personal favorite too. It has many advantages over other internet browsers. It allows the user to customize the browser in the way he wants. More secure then any other browser available in the market.  But it also has some disadvantages like it may take long for firefox to get started. It happens because of overburdened internal database.
SpeedyFox
SpeedyFox
You can make your firefox start faster by cleaning up the SQLite database of it. This can be done by using SpeedyFox. SpeedyFox compacts the database of FireFox that too without any loss of data.
speedyfox
Just download the SpeedyFox from the link given at the end of this post. Run the exe file and click on “Speed My Firefox” button and see the difference in the start up  time of your FireFox.

Download SpeedyFox 0.3

Download latest version of FireFox

- Insert yotube videos in powerpoint presentations

Everyone likes to make cool and unique presentations. You can make your presentations unique by inserting some cool youtube videos related to your project. But how to do that?? Here we have the answer.You can easily embed youtube videos in your PowerPoint Presentations by installing this plugin.
After downloading and installing this plugin go to insert in menu bar. Select “insert YouTube Videos”.
insert youtube videos in powerpoint presentation
Copy and paste the youtube video link in the textbox. Set the options as needed. And done. Now play your presentation and see if it is showing the video or not. You will require internet connection at the time of presentation or else the video won’t load.

Download the YouTube plugin for PowerPoint

- Download books from google books

Google Book Search is the best place to get the thousands of books and magazines. The books available there are of two types. One is those which are free to download which means they are not copy right protected. Other are only for preview. Those copy right protected books can not be downloaded. But still you can read some part of that book for preview.
Google book search has some limitations. You can’t print all pages from any book.You have to print pages one by one. To overcome this problem and to download books in pdf format to your PC you can use this Google Book Downloader software.


google-book-downloader

This tool can download all pages of the books which are not marked as copyright protected. It will download only some pages of the book if the book is only for preview.

Download Google Book Downloader(2.4 MB)

Monday, September 21, 2009

- How to earn money from your blog???

Hi, today I want to write about sites which provides paid review opportunities on your blog. I am earning from these services, these services are based on Paid To Blog. Most of the services pays through PayPal. There are minimum requirements for each service to get approve your blog Most common are
  • Your blog must contain maximum posts of unique content.
  • Your blog must not be completely automated or appear to be created solely for search engine traffic.
  • Your blog must be updated once in a week.
  • Your blog must be older than 90 days and have at least 30 posts to apply.
  • Your blog must have a professional appearance.
It is good if your Blog has Google PageRank and a good Alexa rank. You can make most of it.

SponsoredReviews:
Sponsored Reviews is a marketplace which lets you see paid reviews on your blog. Once you get approved from this site then you can start earning money easily. There are wide range of advertisers present and they provide a range of money that they wish to pay for your review. And you have to provide your maximum bid for your blog. Generally your blog is rated considering 3 features. They are yahoo backlinks, technorati and alexa.


Sponsored Reviews

You will get 65% of the bid amount. That is if you take the task for $10 then earn $6.50 and the remaining goes for the site. So in total this is a great site to earn money online by blogging and you can even earn more than $300 per review.

PayPerPost: The controversial ad network which got into trouble with Google, PayPerPost remains a popular way for bloggers to make money through their blog. If you are a good blogger who likes to update your blog then this is a great opportunity for you. You need to have a blog which is three months old and should be updated regularly. Really this site will give you the best opportunity that you find on the Internet. So if you really want to earn good money with your blog then don't think of joining this later.


Smorty: Smorty is another get paid for blogging site similar like payperpost. But there are some advantags in smorty which makes it unique. You will be paid weekly, which is very quick when compared to other paid to blog sites. Opportunities are directly sent to admin panel and as well as emails. Hence you dont need to check back frequently about the opportunities. So your 15 minutes time earns you money along with some good content to your blog. Your blog need not require higher PR for getting approved. Only a good blog, indexed in google with some good content and updated regularly is fine.

Blog Advertising - Get Paid to Blog

LinkWorth:LinkWorth have a wide range of ways for you to make money through your blog including text and banner ad sales, in text advertising and paid reviews.


BidVertiser: Display the BidVertiser text ads on your website or blog, get paid for every click and have the payments sent directly to your PayPal account. BidVertiser is a site-targeted marketplace whereby advertisers can place their ads on sites that are related to ads


BidVertiser

Join BidVertiser now and they will turn your advertising space into cash! Simply display the BidVertiser text ads on your website and let advertisers bid against each other!

If you have been banned from Google Adsense or wish to extend your publisher revenue, BidVertiser is just a perfect option

SocialSpark: SocialSpark offers bloggers a variety of ways to make money through their blog. You can review products, websites and services and you can display sponsors ads on a per day basis.

SocialSpark

- How to Avoid Having Your AdSense Accout Banned for Click Fraud

If you trawl through the AdSense message boards you can’t help but come across tales of woe from AdSense publishers that have had their account banned by Google.
Below is a list of ways people have been banned from AdSense and information on how to avoid it happening to you.
Don’t click on your own ads
The obvious one but still people do it. Google has the IP address of the computer/s that you’ve used to create and check your AdSense account. If it sees that this IP address clicks one of your ads you’re in trouble.
Don’t do it. It’s theft. Not from Google but from the AdWords advertisers.
If you want to go to a site advertised by one of your ads don’t click on it look at the URL of the advertising site at the bottom of the ad and type it into your browser.
If you click on one accidentally (which does happen) you’re probably be ok but it’s worth dropping a quick email to Google with an explanation and apology
Don’t log in to AdSense from a shared computer.
As I said above Google keeps a record of every machine IP address used to look at your account. If you check your stats on a machine then someone else clicks on your ads from the same machine Google sees this as click fraud. Worth bearing in mind when thinking of checking your stats from somewhere like an Internet Café.
Don’t log in to your AdSense account from work.
Apart from getting in trouble with the company that employs you there’s also a further real risk. Most companies use a proxy server to access the Internet. A proxy server with ONE IP ADDRESS. Therefore you checking your ads from work means this proxy IP address being recorded by Google as one that you use. Problem is if there are 1000 people in your company it is the same IP address for them too. Google can’t differentiate between you and the other 999 employees in your company. If one of these 999 clicks on one of your ads it’s ban time.
Don’t get into a ‘I’ll click your ads if you click mine’ agreement with another Webmaster.
As above Google will have your IP address and that of every AdSense publisher. If they see these IP addresses consistently clicking on each other ads it’s goodbye for both of you.
Don’t tell friends and family.
Telling friends and family about your money making websites can lead to problems. Even if you tell them not to click on your ads there’s always the chance that Auntie Maud will think it’s a good idea to make some extra money for her favourite nephew. 100 clicks later from the same visitor and your account is screaming ‘Click Fraud’.
Receiving clicks from illegal traffic
Check the AdSense TOS for sources of traffic that aren’t allowed by Google. These include methods like Traffic exchange, PTC advertising, Auto surf etc.
Do monitor your visitor and AdSense figures
Check your account at least once a day. If you see a massive spike coupled with a massive increase in Page CTR investigate using your visitor stats website. If you see it’s all come from the same IP address you could have been the victim of a malicious attack – inform Google via email and offer them access to your logs.

- Configuring BitTorrent ot MuTorrent To Get Fast Downloading Speed.

Normally when downloading torrents through torrent clients (Mu torrent etc) one does not get good downloading speeds and it becomes very annoying especially on slow internet connections. Actually it is not the software or torrents at fault but the default settings of MuTorrent (Or BitTorrent) are the culprits. When you download a torrent it is not only downloaded but also uploaded at the same time (Actually it is “Sharing”). Thus uploading also take your bandwidth reducing downloading speeds. By tweaking some settings you can reduce uploading speeds and increase downloading speed. Just follow the below given instructions:

1. Launch Mu Torrent and go to “Options/Preferences” (Or simply press Ctrl+P keys)
2. Change the default settings according to the below given snapshots i.e. the settings must be changed exactly as in the pictures below.

3. Click “Apply” and then “OK” and you are done

- Error message when computer starts??

"Windows\System32\config\system" file missing or corrupt

Solution::
Boot using Windows Setup CD and enter into "Recovery Console" by pressing "R". Now Log into windows installation and enter admin password. Now give following commands at prompt:

copy %windir%\Repair\system %windir%\System32\Config

If it doesnt work, then again boot into "Recovery Console" and give following commands:

fixmbr
bootcfg /scan
bootcfg /rebuild
fixboot


Win XP Tweaks

STARTUP

- Scandisk runs even after proper shut down??

Solution:
Do as following:

A. Open regedit and goto:

Code:
HKEY_LOCAL_MACHINE\SYSTEM\CurrentControlSet\Control\Session Manager

In right-side pane, change the value of BootExecute to:

autocheck autochk *

B. If the above trick doesnt help then give following commands in Command Prompt:

chkntfs /x drive_name

for e.g., if ScanDisk runs automatically for C: and D: drives, then give following commands one by one:

chkntfs /x C:
chkntfs /x D:

- Task manager disabled???

SOLUTION 1:
Click Start --> Run
Enter gpedit.msc in the Open box and click OK
In the Group Policy settings window, select User Configuration
Select Administrative Templates
Select System
Select Ctrl+Alt+Delete options
Select Remove Task Manager
Double-click the Remove Task Manager option
Disable that option

SOLUTION 2:
Click on Start >> Run and in the Open box type:

REG add HKCU\Software\Microsoft\Windows\CurrentVersion\Policies\System /v DisableTaskMgr /t REG_DWORD /d 0 /f

Click OK.

- Hidden files not appearing even after enabling "show hidden files " option

Solution1: Go to your Start menu, click on Run and open up your Registry Editor by typing "regedit" without the quotes and pressing OK.

Once there go to: HKEY_LOCAL_MACHINE\Software\Microsoft\Windows\CurrentVersion\Explorer\Advanced\Folde r\Hidden\SHOWALL

Delete the value CheckedValue. (Its type should be REG_SZ and data should be 0 or 1.)

Create a new DWORD value called CheckedValue (same as above, except that the type is REG_DWORD) by right clicking on the right pane->New->DWORD Value. Modify the value data to 1 (0x00000001).
Solution 2: Open regedit and goto:
HKEY_CURRENT_USER\Software\Microsoft\Windows\CurrentVersion\Explorer\Advanced
In right-side pane, change value of "Hidden" to as following:

1 - To show hidden file
2 - To not show hidden files

If it doesn't work, then scan your computer with an anti-virus software.

- Download Multiple Free Files From Rapidshare

Rapidshare allows to download only a single file at a time with free account. If you want to download multiple files at the same time, you need to buy a premium account but now you can download multiple files from Rapidshare free account without paying anything with RapidShare Download Accelerator.


With RapidShare Download Accelerator, you can add all the files you'd like to download, and it will do all the annoying work for you. Now you can just sit back and watch your files download without paying a dime.

Links : Download Rapidshare Download Accelerator

- See all rapidshare folders

See all rapidshare folders

Use following keywords in google to see all rapidshare folders available on internet

site:rapidshare.com inurl:users "*"

site:rapidshare.de inurl:users "*"

site:rapidshare.com inurl:files "*"

site:rapidshare.de inurl:files "*"

site:rapidshare.com inurl:users (pass|password)

site:rapidshare.de inurl:users (pass|password)

Suppose u need some info on hacking.Then u can try following keywords to see all rapidshare folders having any hacking related thing in it

site:rapidshare.com inurl:users "hack"

site:rapidshare.com inurl:users "hacking

- Stop error meassage at shut down

Some users have gotten an error message similar to the following when attempting either to shutdown or restart Win XP:

STOP 0000009F, DRIVER_POWER_STATE_FAILURE
STOP 0x0000001E: KMODE_EXCEPTION_NOT_HANDLED
STOP 0x000000D1: DRIVER_IRQL_NOT_LESS_OR_EQUAL

TechNet and the Microsoft Knowledge Base have numerous articles discussing this type of error condition; for example, these. As a review of these articles will show, these are commonly device driver problems, but may also be caused by troublesome software (such as the notorious CrashGuard), or a problem in a system service. MSKB article Q262575 discusses a shutdown problem of this type, known to exist in Windows 2000 due to a resource (IRQ) conflict, if you have PACE Interlok anti-piracy software installed. This problem may occur in Windows XP as well.
Microsoft advises the following as one approach to these problems: Restart the computer. Press F8 during the restart and select “Last Known Good Configuration.” If you catch the problem when it first occurs (meaning you likely have installed only one or two drivers or new service), this will return you to a previous working condition. (Would System Restore accomplish the same thing? I don’t know, and don’t have a broken system to test it on.)

Microsoft reported similarly that these STOP code error message occur when Windows XP is trying to shut down devices. He says that he has seen this twice: once with Logitech Quickcam installed (with an unsupported driver), and once with a USB DSL modem that would hang if it wasn’t disconnected before shutdown.

- Increase torrent downloading speed

This is the most important query that i often hear "How to increase my torrent download speed ". Torrents occupies most of the internet users heart .So inorder to increase its speed , do the following :

To Do 1:
Increase Your TCP Connections :
Normally windows Restricts you to use only 10 TCP , to provide security to your Pc's . You can increase this 10 to about the range between 50 to 100 . For this you need to install this patch .


To Do 2:
Port Forwarding :
Every Ip address is divided into different Port Numbers .Each application use different Port number . You should have a separate port for your Torrent dowloader to download . So that you need to Forward your Port to download . Follow these steps
1] Goto portforwarding.com
2] Select Your Modem , from the list given in the site .
3] Now select the Torrent Application
4] Follow the Steps given .

To Do 3:
Minimising your Upload Limit :
Your upload speed will be defaultly set to maximum . So you need to decrease it to enable more downloading . The ratio should around 80 : 100 upload limit .
~If you have Bittorrent Client READ THIS to optimise your settings .
~If you have BitComet SEE THIS

To Do 4:
Disable Windows Firewall :
If you use Windows Firewall disable it and go for some other option which is P2p friendly ! Because Windows firewall hates the P2p connections .

To Do 5 :
Queuing Settings :
According to the download speed , you can limit the number of torrents you download . For example , If you have 256 kbps , the normal limit of torrents will be 5 . So decide how many you are going to download , you can download multiple small files , or some few larger files at the same time !

Try these and your can download the Torrents in high speed !!

- Remove virus from USB drives

One of the ways by which a virus can infect your PC is through USB/Pen drives. Common viruses such as ’Ravmon’ , ‘New Folder.exe’, ‘Orkut is banned’ etc are spreading through USB drives. Most anti virus programs are unable to detect them and even if they do, in most cases they are unable to delete the file, only quarantine it. Here are the things which you can do if you want to remove such viruses from your USB Drive

Whenever you plug a USB drive in your system, a window will appear similar to the one shown below
USB
Don’t click on Ok , just choose ‘Cancel’. Open the Command Prompt by typing ‘cmd‘ in the run box. In the command prompt type the drive letter: and press enter . Now type dir /w/a and press enter.
This will display a list of the files in the pen drive. Check whether the following files are there or not
  • Autorun.inf
  • Ravmon.exe
  • New Folder.exe
  • svchost.exe
  • Heap41a
  • or any other exe file which may be suspicious.
If any of the above files are there, then probably the USB drive is infected. In command prompt type attrib -r -a -s -h *.* and press enter. This will remove the Read Only, Archive, System and hidden file attribute from all the files. Now just delete the files using the command del filename. example del Ravmon.exe. Delete all the files that are suspicious. To be on a safer side, just scan the USB drive with an anti virus program to check whether it is free of virus or not. Now remove the drive and plug it again. In most of the cases, the real culprit turns out to be the “Autorun.inf” file which mostly gets executed when someone clicks Ok in the dialog window which appears above. Thus the infections can spread
Security Tip
Disable the Autoplay feature of USB drives. If you disable the Autoplay feature of USB drives, then there are lesser chances of the virus spreading. A tool which can perform such a function is Tweak UI. Download it from here install it.
Tweak UI

- Virtual Memory too low Warning Trouble in win xp and vista

When there is less physical memory than needed, then some virtual memory (virtual RAM) is created on the disk. When there is a limit set to the size of virtual memory usage and there is not enough of it present there is a warning that frequently comes “Virtual Memory too low”.

Solution 1 :

This problem occurs when physical RAM + Virtual RAM (usually created on hard disk) together are not sufficient to take care of the currently needed RAM size, or this situation is about to arise. This usually happens when some fixed upper limit for Virtual Memory has been set. To solve this problem, you can either upgrade you physical RAM on your computer (recommended), or you can set the Virtual Memory to system managed size or you can do both. Setting Virtual Memory to system managed size means windows will set it to higher size whenever needed automatically,for this,


Right click on My computer --> goto properties, goto advanced tab, click on performance settings, now click on advanced, now click on advanced, now click on change button for Virtual memory.


On this screen select the System managed size, press OK. After this re-start your computer. This will solve the virtual memory too low problem.

Solution 2:
Recommended solution is to upgrade your physical memory (RAM) according to requirements of the kind of applications that you run on your computer. If you upgrade RAM or not, the following procedure will help prevent this warning by increasing the virtual memory limit.
  • Right click on My computer icon and click properties.
  • This will show system properties window. Click on a advanced tab and click on the settings button under heading performance.
  • This will open performance options window. Click on advanced tab and click on change button under heading virtual memory.
  • Check if the space available is set to some custom value or double the RAM size ?
  • If it is not double the RAM memory size , then select the size option set the virtual memory size double the RAM Size and press set button and press OK button.
  • Restart the computer.

- Recover a corrupted system file

If an essential Windows file gets whacked by a virus or otherwise corrupted, restore it from the Windows CD. Search the CD for the filename, replacing the last character with an underscore; for example, Notepad.ex_. If it's found, open a command prompt and enter the command EXPAND, followed by the full pathname of the file and of the desired destination: EXPAND D:\SETUP\NOTEPAD.EX_ C:\Windows\NOTEPAD.EXE. If either pathname contains any spaces, surround it with double quotes.

If the file isn't found, search on the unmodified filename. It will probably be inside a CAB file, which Win XP treats as a folder. Simply right-drag and copy the file to the desired location. In other Windows platforms, search for a file matching *.cab that contains the filename. When the search is done, open a command prompt and enter EXTRACT /L followed by the desired location, the full pathname of the CAB file, and the desired filename; for example: EXTRACT /L C:\Windows D:\I386\Driver.cab Notepad.exe. Again, if the destination or CAB file pathname contains spaces, surround it with double quotes.

- Send FAX with Windows XP

Windows XP has a great feature that allows users to send, receive, and monitor their faxes. Having said that, if you are running Windows XP, you can send and receive faxes right on your computer, without a need of a fax machine. All you need is a modem. You might need a scanner though, if you only a hard copy of your document, to scan your document.
This instruction will show you how to send a fax in Windows XP using the Fax Service. This instruction does not provide details how to enable or configure the fax service. Please go here for information how to enable and configure the fax service in Windows XP.
I assume that the fax service has been enabled and configured on your computer. This also means that a modem has been installed and setup to use with the fax service.

Here's how

  1. Open the document, Web page, or e-mail message you want to fax. If you want to fax image(s), you can create a Word document and insert your images there.
  2. On the "File menu", click "Print". i.e. the following sample image using Microsoft Word.
  3. Select "Fax" from the "Printer" list. Then, click "OK".


  4. On the "Welcome to the Send Fax Wizard" page, click "Next".
  5. On the "Recipient Information" page, type the recipient name in the "To" box.
    Type the recipient fax number in the "Fax number" box. click "Next".
  6. On the "Preparing the Cover Page" page, select the "Select a cover page template with the following information" check box.
    Select the template you want to use under "Cover page template" list.
    Enter the subject in the "Subject" line
    Optionally, enter notes in the "Note" box.
    Then, click "Next".
  7. On the "Schedule" page, click "Next".
  8. On the "Completing the Send Fax Wizard" page, click "Finish".
  9. Your computer will display the "Fax Monitor" dialog and start sending fax

Sunday, September 20, 2009

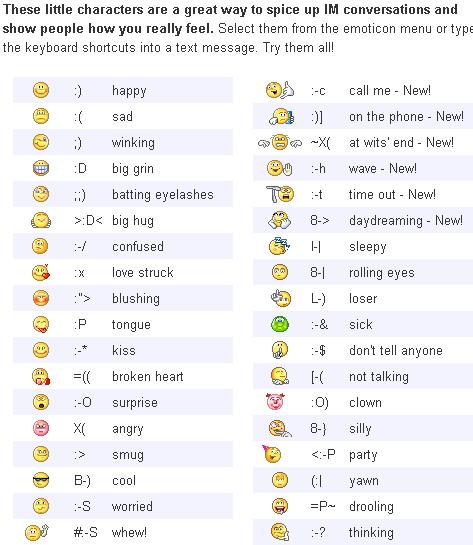
- Hidden emotions in Yahoo


- Multiple login in yahoo without using a softtware

You can login with multiple id's on the same yahoo messenger without any download or patch .
Follow these steps :


1. Go to Start ----> Run . Type regedit, then enter .

2.Navigate to HKEY_CURRENT_USER --------> Software --->yahoo ----->pager---->Test

3.On the right page , right-click and choose new Dword value .

4.Rename it as Plural.

5.Double click and assign a decimal value of 1.


Its done!!
Now close registry and restart yahoo messenger and try Multiple Login


- Find who is invisible on yahoo messenger

Sometimes some of your friends who appear offline in yahoo messenger may not be actually offline, they may in the 'Invisible' mode. This maybe if they are trying to ignore you or are too busy to talk to anyone.

There is this small trick that you can use to find out what the truth is.

Firstly open your yahoo messenger main window and double click on the name of the person whom you want to check. The chat window will open obviously.


Click IMVironment button, select See all IMVironments, select Yahoo! Tools or Interactive Fun, and click on Doodle.
After loading the Doodle imvironment there can be two possibilities

1.If the user is offline Doodle are will show this "waiting for your friend to load Doodle" continuously .See in the picture below:


2. If the user is online (but in invisible mode), after few seconds (it can take up to one minute, depending on your connection speed), you should get a blank page like in the picture below. So you know that the user is online.

- Top 20 things to keep your system faster

 1. Wallpapers: They slow your whole system down, so if you're willing to compromise, have a basic plain one instead!


2. Drivers: Update your hardware drivers as frequently as possible.  New drivers tend to increase system speed especially in the case of graphics cards, their drivers are updated by the manufacturer very frequently!

3. Minimizing: If you want to use several programs at the same time then minimize those you are not using.  This helps reduce the overload on RAM.

4. Boot Faster: The 'starting Windows 95/98' message on startup can delay your booting for a couple of seconds.  To get rid of this message go to c:\ and find the file Msdos.sys.  Remove the Read-Only option.  Next, open it in Notepad or any other text editor.  Finally, go to the text 'Options' within the file and make the following changes: Add BootDelay=0.  To make your booting even faster, set add Logo=0 to remove the Windows logo at startup.

5. Restart only Windows: When restarting your PC, hold down Shift to only restart Windows rather than the whole system which will only take a fraction of the time.

6. Turn Off Animations:  Go to Display Settings from the Control Panel and switch to the Effects Tab. Now turn off Show Windows Content While Dragging and Smooth Edges on Screen Fonts.  This tip is also helpful with Windows XP because of the various fade/scroll effects.

7. Faster Start-Menu Access: Go to the Start menu and select Run.  Now type Regedit and hit Enter.  The Registry Editor will appear on the screen.  Now, open the folder HKEY_CURRENT_USER\Control Panel\Desktop.  You should see a MenuShowDelay value.  If you don't then do the following: right click on a blank space in the right pane and select New\String.  Change the name in the new value to MenuShowDelay.  Now that we have the MenuShowDelay value, double click on it and enter 0 in the value data field.  This sets the start menu delay to 0 milliseconds.

8. Resolutions: If you are willing to do anything for faster performance from your PC, then try lowering your display resolution.  The lower it is, the faster your PC.

9. Turn off Active Desktop:  Go to your Display Properties and switch to the Web tab.  Uncheck View My Active Desktop As a Web Page.  Since the Active Desktop option under Windows 98 uses a lot of system resources, this option can have a dramatic effect on the speed of the whole system.

10. Defragment Often:  Windows 98's Defrag tool uses Application Acceleration from Intel which means that when you defragment your drive, data is physically arranged on the drive so that applications will load faster.

11. Take your PC to Bed:  Using the Advanced Power Management feature under Windows 98 gives you the option to use the sleep command.  That way, you can send your PC to sleep instead of shutting it down and then restarting it.  It's as simple as pressing a button and then pressing the same button to wake it up.  You can tell Windows after how many minutes/hours of inactivity to automatically sleep the machine in the Advanced Power Management section of the Control Panel.

12. Faster Internet Access: If you use the internet for reference and the sites you visit are rarely  updated then try the following.  In IE (the same can be done in Netscape) go to Tools, Internet Options.  Next, click on Settings... in the Temporary Internet Files  section.  Finally, select Never for the first option and double the amount of storage space to use, click OK!

13. Benchmarking: Benchmarking can be very useful when run frequently.  It can tell you how your PC's components are performing and then compare them to other machines like yours.  For example, when you overclock your PC, you want to know how much more speed you have and whether it is stable.  All this and more can be discovered using benchmarking.  An excellent piece of software for doing this job is SiSoft Sandra which can be found in the Downloads File Archive!

14. Refresh the Taskbar without restarting: If you in some way change the taskbar, either in Regedit or elsewhere, you can refresh the task bar without restarting.  Hold down Ctrl Alt Del, and double click on Explorer.  Say Yes to close Explorer, but no to closing Windows.  This will refresh the Taskbar and system tray.

15. Quick CD Eject: Instead of pushing the button on your drive, right-click your CD drive letter in My Computer and click on Eject.  This will also remove any icons that have become associated with the CD drive.

16. Start Up Programs:  Windows can be slowed down when programs run on start up.  To eliminate this, check your Start up folder.  You can access it from the start menu: Start, Programs, Start Up.  Another way to eliminate programs from loading even before Windows actually starts is by doing the following: Click on Start, then Run.  Type msconfig.  It will take quite a long time for this program to load, but when you finally see it on your screen, explore the different tabs.  They all have to do with how quickly your PC boots, so select what you want, and uncheck what you don't want!

17. Fonts: When Windows starts, it loads every single font in the Fonts folder.  Therefore, the more fonts you have, the slower the booting process.  To get rid of unwanted fonts, simply go to the Fonts folder under c:\windows and remove whatever you don't want.  Fonts that have a red letter 'A' as their icon are system fonts, so don't delete them.

18. Stretching Wallpapers:  Don't "stretch" your wallpaper in Windows 98 since it actually slows Windows down when you drag icons around on the desktop.


19. RAM Matters: If you have less than 32MB then you should seriously think of upgrading it to at least 64MB.  Windows runs much more smoothly with 64MB or higher and tends to use less hard disk space for virtual memory.

20. Partitioning: A very nice little thing you can do to boost system performance.  By partitioning your hard drive, splitting one physical drive into several logical ones, you can gain several advantages.  1. If you get a virus or you accidentally format a drive, not all will be lost.  2. By placing the swap file (Win386.swp) on a separate drive, The swap file will be less fragmented and thus, faster. 3. Place Windows on a separate drive and whenever you need to reinstall it, you rest assured that your data is safe on a separate drive.  Partitioning can be done using a few programs such as FDisk which comes with DOS.  However, FDisk formats everything on the hard disk before partitioning. Alternatively, you can use Partition Magic from Power Quest to partition your hard disk without losing your data.


- Remove annoying delete confirmation messages

Although not strictly a performance tweak I love this fix as it makes my machine 'feel' faster. I hate the annoying 'are you sure?' messages that XP displays, especially if I have to use a laptop touchpad to close them. To remove these messages:

1. Right-click on the 'Recycle Bin' on the desktop and then click 'Properties'

2. Clear the 'Display Delete Confirmation Dialog' check box and click 'Ok'

If you do accidently delete a file don't worry as all is not lost. Just go to your Recycle Bin and 'Restore' the file.


- Speed up folder browsing

You may have noticed that everytime you open my computer to browse folders that there is a slight delay. This is because Windows XP automatically searches for network files and printers everytime you open Windows Explorer. To fix this and to increase browsing significantly:

1. Open My Computer
 

2. Click on Tools menu
 

3. Click on Folder Options
 

4. Click on the View tab.
 

5. Uncheck the Automatically search for network folders and printers check box
 

6. Click Apply
 

7. Click Ok
 

8. Reboot your computer

- Disable CD autorun in your pc

YOu can disable autorun in your pc by following:-


( WinXP PRO Only)

1) Click Start, Run and enter GPEDIT.MSC

2) Go to Computer Configuration, Administrative Templates, System.

3) Locate the entry for Turn autoplay off and modify it as you desire.

Have fun...enjoy the faster speed of your pc...

- Make yourself invisible in orkut

For making your name invisible follow the steps:
1) Click on edit profile
2) Type ALT + 0173 in your first name and last name. (i.e. Type 0173 while pressing the ALT key of your keyboard.)
3) Click on Update

- Check community stuff in orkut without logging in

This is the link that will do the trick :

http://orkutfeed.789mb.com/?c=ID

 Just replace the ID with your Community ID (like 9243527)

 Example : http://orkutfeed.789mb.com/?c=9243526

 Paste and run the edited link in your address bar to check the activity in your community.

You are Done.

- Increase your RAM and so system speed

1). Start any application, say Word. Open some large documents.
 

2). Press CTRL+SHIFT+ESC to open Windows Task Manager and click Processes tab and sort the list in descending order on Mem Usage. You will notice that WINWORD.EXE will be somewhere at the top, using multiple MBs of memory.

3). Now switch to Word and simply minimize it. (Don't use the Minimize All Windows option of the task bar).

4). Now go back to the Windows Task Manager and see where WINWORD.EXE is listed. Most probably you will not find it at the top. You will typically have to scroll to the bottom of the list to find Word. Now check out the amount of RAM it is using. Surprised? The memory utilization has reduced by a huge amount.

5). Minimize each application that you are currently not working on by clicking on the Minimize button & you can increase the amount of available RAM by a substantial margin. Depending upon the number and type of applications you use together, the difference can be as much as 50 percent of extra RAM.

In any multitasking system, minimizing an application means that it won't be utilized by the user right now. Therefore, the OS automatically makes the application use virtual memory & keeps bare


- Download from a paypal site without paying a single penny

Just a little basic html tip for those who are trying to download an application from sites which has an paypal order page & link to start you off.

Use a proxy when you try this to hide your ip as some sites will record your ip when you connect for security.

1) Rightclick your mouse (ctrl+click) viewsource and open the source of the site in an a texteditor
2) Search for the word "return"
3) Next to it you can find the url for the thank you page
4) Copy the url and paste it in your browser and you will see the download link

This works only if you can download instantly after payment, it will not work if the link needs to be emailed to you.

You can try it here to start with:
Code:
http://www.ramphelp.com/halfpipe.html


About half way down the page you will find:

<input type="hidden" name="return" value="http://www.ramphelp.com/65984523/thanks/68912hp654/26865thankyouhp08363215423.html ">

Copy the link into your browser and download.

- Rapidshare hacked, unlimited downloading and no timelimit

Rapidshare Hacked, unlimited upload, no countdown

UNLIMITED download/upload
Its very easy to fool Rapid Share server if your IP address is assigned by your ISP. Just follow these simple steps:

clean up IE or netscape or Firefox cookie( In this case the one that belong to rapidshare website)
On Command prompt (open MS-DOS)
type -----> ipconfig /flushdns <---Enter
type -----> ipconfig /release <---Enter
type -----> ipconfig /renew <---Enter
type -----> exit <--------Enter

Or save these commands in a bat file and run it everytime you need to fool Rapidshare server. Remember to clean up rapidshare cookie in your temp Internet files folder.

Now you should be ready to download/upload as many files as you want from their server.

another way, get proxies from the internet and apply to the browser.
some of proxies might not work though...

Note:
If you are on a LAN and behind a router (using NAT, for example)---this will not work.
If you use a fixed proxy--- this will not work.
If you have a fixed IP address from your ISP or college or employer or whatever -- this will not work.
If you happen to get the same IP address from your DHCP server because it's assigned to you -- this will not work

NO waiting
THIS "cheat" for RAPIDSHARE DOWNLOADS eliminates the "WAITING" for the file. No more COUNTDOWNS. So heres what you do:

1. First, Find a rapidshare download.
2. Hit the FREE BUTTON, like always.
3. While your waiting for it to countdown, change the URL in the bar to:
Code:
java script:c(countdown = 0);
and hit ENTER or the GO button over and over. Eachtime you do so, it decreases 10-20 seconds. Few times and the link appears.
or you can simply do the code below ONCE
java script: for (i=0; i<30; i++) { c(); }

- Create your own radio station

How To make your own Radio Station ...

::Must HAVE Winamp (Any Version)::

First, things First your speed has to be at least 256/64 kbps (which means Dial-up users, will have alot of latency, just don't bother)

Second, your going to have to have a domain, an updated one with the current i.p active. (Could be anything e.g. My sig)

Now, Your gonna have to download the Shoutcast Files.

Go to
:
www.shoutcast.com

to get the files.

Ok After downloading these, installing Both of them in any order i dnt care. Go to START>PROGRAM FILES>SHOUTcast DNAS>EDIT SHOUTCAST DNS CONFIG.

Ok your gonna have to Configure it:
Go Down and where it says password: change (that means your gonna have to change it to whatever, make sure u remember)

The Portbase: change it to whatever port you want it
Maxusers: (lets be realistic here, dnt put in 10000, like NXS's radio station) your bandwidth has to be extremely good, if your cable, 50 user max is ok, ADSL should stay below 10 users, and T1 connections should do whatever tickles there fantasy.

EDIT>SAVE.

Open winamp, RIGHT CLICK>OPTIONS>PREFRENCES>DSP EFFECT> and choose the NULLSOFT SHOUTCAST.

Go to OUTPUT, and then click on Connection, Through the ADDRESS, type your address which you have done through
Code:
www.no-ip.com

PORT NUMBER, whatever u did in the EDIT.txt, and your password.

Then go to Encoder, and choose your quality of your music. Go back to OUTPUT>OUTPUT CONFIG> YELLOW PAGES. this is your advertisemant information. dow hatever you like there.

Now Connect. to check that your Radio os on-line go to http:// (your address that you added in the prefrence)

- Increase your download speed by 100-200kbps

First of all download this wonderful program:

------<Click here to downlaod>-------

Then when u start the program goto settings goto cable modem or dsl whatevcer u have.

Go to MaxMTU and set it to 1500 this is optimal anything above this will not work as well.

Thats bout it!! Enjoy the speed!!

- Overburn a CD with NERO

How do I overburn a CD with Nero?

 Start Nero

From the action-bar select File and select Preferences.


In the Preferences window, select Expert Features(1) and check the Enable overburn disc-at-once(2).


Choose a Maximum CD Length(3) and click OK(4) (*82:59:59 is the maximum value I suggest, but as you can see from the screen capture above I have set mine significantly higher. The reason is because I frequently use 99min 850 MB CD media).

For a more accurate test you can use a nero tool called nero speed test to see how much a specific CD is capable of being overburned . get it here

From the action-bar select File and select Write CD.


A window will appear when you have exceeded expected length, click OK to start the overburn copy.

Remember to set disk to burn Disc at Once, you cannot overburn in Track at Once Mode.

Saturday, September 19, 2009

- Create a simple search engine in PHP

Introduction:

This is the first in what I hope will be a long list of tutorials that I like to call Practical Programming in PHP. Lets get down to business, today I'm going to show you how to create a simple search engine that you can use for your very own site or some other project that you may be working on. For this tutorial I will be using a MySQL database. The bulk of the code should be compatible with PHP 3 and 4.

Background:

Before we begin, I'll show you the table I'll be using in the examples:
First_Name
Middle_Name
Last_Name
Dana
Johnson
Smith
Jill
Angel
Petersburg
Jack
Coner
Mitchel
If you feel confused about any of the functions in the tutorial, have a look at my previous tutorial that deals with common database functions.

Down To Work:

Before we actually make the search engine, we need to create a basic webpage that will have an input field where the user can enter his or her search query. I'm going to keep mine simple; feel free to make an elaborate one with lots of bells and whistles. The code for my page is below:
  Simple Search Engine version 1.0
<html>

<head>

  <title>Simple Search Engine version 1.0</title>

</head>

<body>

  <center>

    Enter the first, last, or middle name of the person you are looking for:

    <form action="search.php" method="post">

      <input type="text" name="search_query" maxlength="25" size="15"><br>

      <input type="reset" name="reset" value="Reset"> 

      <input type="text" name="submit" value="Submit">

    </form>

  </center> 

</body>

</html>


It's a pretty basic page so I'm not going to explain alot of it. Basically, the user will enter the first, middle, or last name of the person they are looking for and hit enter. The contents of the input field will be passed to a php script named “search.php” which will handle the rest.
Now that the page is out of the way, let's create the actual script. First, we need to connect to the database using mysql_pconnect() and select the table using mysql_select_db(). Next, we want to parse the value passed to the script to see if it contains any invalid input, such as numbers and funky characters like #&amp;*^. You should always validate input, don't rely on things like JavaScript to do it for you, because once the user disables JavaScript all that fancy validation goes down the toilet. To check the input we are going to use a regular expression, they are a bit confusing and will be explained in a later tutorial. For now, all you need to know is that it will check to see if value passed is a string of characters. All right, enough chatter, here is the first part of the script:
 

<?php 

  mysql_pconnect("host", "username", "password") or die("Can't connect!");

  mysql_select_db("Names") or die("Can't select database!"); 


  if (!eregi("[[:alpha:]]", $search_query))

  {

    echo "Error: you have entered an invalid query, you can only use characters!<br>";

    exit;

  }

Now that we've done that, we will form the search query.
 
$query= mysql_query("SELECT * FROM some_table WHERE First_Name= '$search_query' 

OR Middle_Name= '$search_query' OR Last_Name= '$search_query' ORDER BY Last_Name");

Look confusing? I'll explain, what's happening is, we're asking MySQL to search all the rows in First_Name, Middle_Name, and Last_Name for a match to the query entered by the user; then, take the results of that search, alphabetize the results by Last_Name.
The rest of the coding from now on is a breeze. We will get the results from the query using mysql_fetch_array( ), and check to see if there is a match using mysql_num_rows(). If there is a match, or matches, we will output it along with the number of matches found; if there isn't, we'll report to the user that we couldn't find anything.
 
$result= mysql_num_rows($query);


  if ($result == 0)

  {

    echo "Sorry, I couldn't find any user that matches your query ($search_query)";

    exit; 

  }

  else if ($result == 1)

  {

    echo "I've found 1 match!
";

  }

  else {

    echo "I've found $result matches! 
";

  }


  while ($row= mysql_fetch_array($query))

  {

    $first_name= $row["First_Name"];

    $middle_name = $row["Middle_Name"];

    $last_name = $row["Last_Name"];


    echo "The first name of the user is: $first_name.
";

    echo "The middle name of the user is: $middle_name.
";

    echo "The last name of the user is: $last_name.
";

  }

?&gt;

I added that extra if statement so that when we report how many users we've found, its output will be in proper English. If I we don't, the script will echo "I've found 1 matches" which obviously isn't good grammar :P The rest of the script loops through the results and prints them to a webpage. That's all, we've finished the script!
The entire script is included below:
 
Simple Search Engine version 1.0 - Results 
<html>

<head>

  <title>Simple Search Engine version 1.0 - Results </title>

</head>

<body> 

<?php 

  mysql_pconnect("host", "username", "password") or die("Can't connect!");

  mysql_select_db("Names") or die("Can't select database!"); 


  if (!eregi("[[:alpha:]]", $search_query))

  {

    echo "Error: you have entered an invalid query, you can only use characters!<br>";

    exit; //No need to execute the rest of the script.

  }


  $query= mysql_query("SELECT * FROM some_table WHERE First_Name='$search_query' 

  OR Middle_Name= '$search_query' OR Last_Name='$search_query' ORDER BY Last_Name");


  $result= mysql_numrows($query);


  if ($result == 0)

  {

    echo "Sorry, I couldn't find any user that matches your query ($search_query)";

    exit; //No results found, why bother executing the rest of the script?

  }

  else if ($result == 1)

  {

    echo "I've found <b>1</b> match!<br>";

  }

  else {

    echo "I've found <b>$result</b> matches!<br>";

  }


  while ($row= mysql_fetch_array($query))

  {

    $first_name= $row["First_Name"];

    $middle_name = $row["Middle_Name"];

    $last_name = $row["Last_Name"];


    echo "The first name of the user is: $first_name.<br>";

    echo "The middle name of the user is: $middle_name.<br>";

    echo "The last name of the user is: $last_name. <br>";

  }

?> 

</body>

</html>